J74 Progressive SE (Standalone Edition) - Setup and FAQ page
[1] - How does J74 Progressive SE work?
J74 Progressive SE is a standalone desktop application which can be used in combination with any MIDI-capable Digital Audio Workstation (DAW). The integration with a DAW is achieved by use of standard MIDI files (created by Progressive SE, imported on the DAW) and by MIDI communication across the applications. The picture below provides a visualization of this concept and of the type of setup involved:
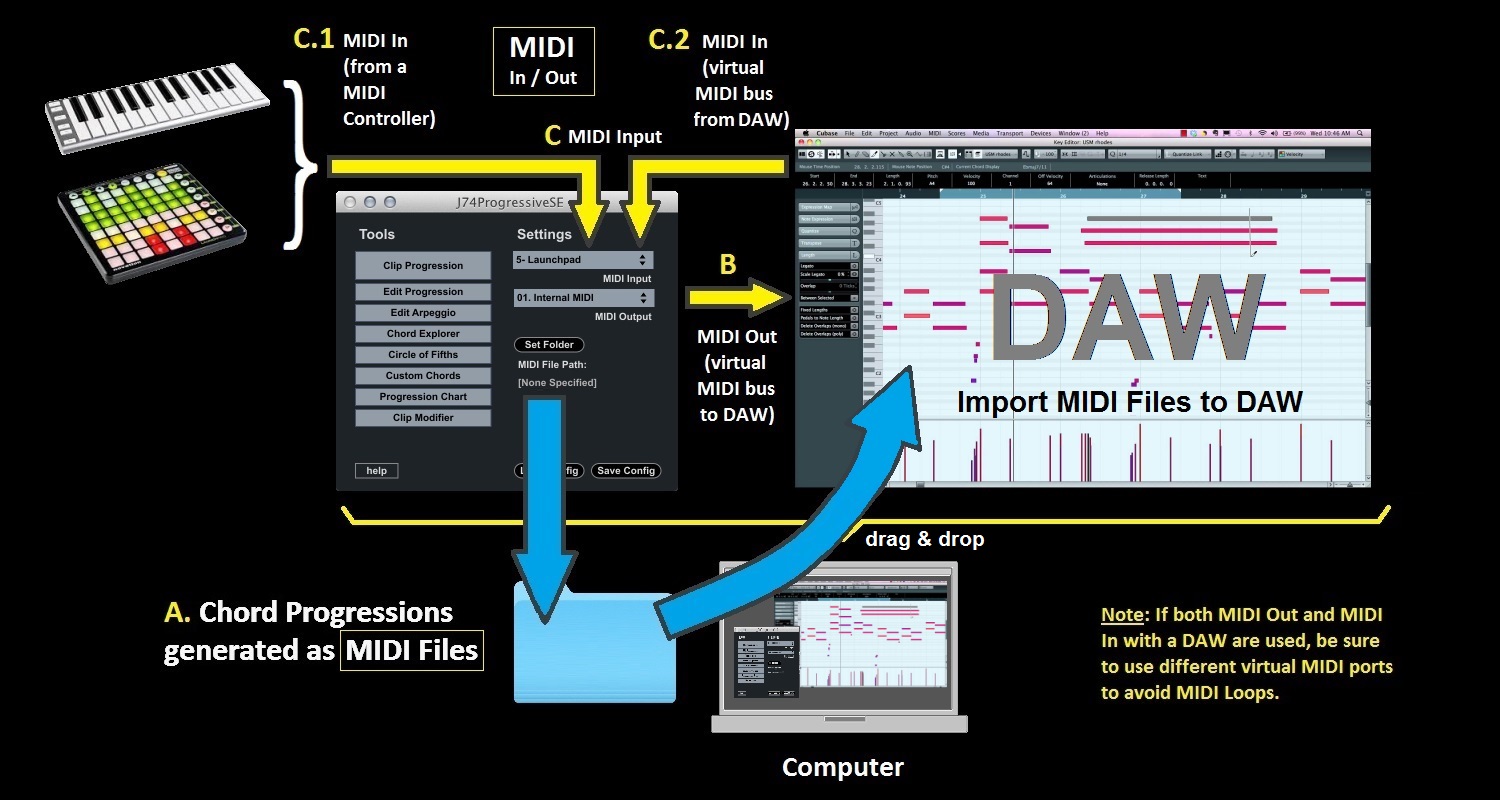
As depicted in the picture:
[A] The application creates chord progression "clips" as standard MIDI files, which you can import in all modern DAW's, usually by a drag'n'drop action.
[B] Progressive SE also generate MIDI notes (e.g. in Live Mode or with its Chord Explorer) and sends them in output to a DAW, on a virtual MIDI port.
[C] The software accepts MIDI input notes for triggering the Chord Explorer chord buttons. Two applications of this are possible:
[C.1] You can use a MIDI controller to trigger the chord buttons of the Chord Explorer (jamming hands-on).
[C.2] You can sequence the chord buttons of the Chord Explorer from a MIDI sequencer (or DAW), using in this case another virtual MIDI port.
Note: if you want to use both MIDI output (B) and MIDI input (C) through virtual MIDI ports, be sure to use separate virtual MIDI ports to avoid MIDI loops!
Note for MAC users:
When you try to start the application for the first time the Mac OS will by default block it, as it does not recognize the developer.
You solve this by doing:
1) Right Click on the app icon and select OPEN from the right-click menu choice.
2) A Pop-up window will come and ask you to confirm. Click on Open to confirm.
3) The app will run.
Next time you can just open it as usual and you will not be asked again.
[2] - How do I install J74 Progressive SE on my computer?
To install the software, after you completed the download, unzip the ZIP package and look for the folder dedicated to your system OS. Copy this folder to any location you like to use on your computer. In this folder you will find the application executable.
[3] - What is a virtual MIDI bus? Do I need to install this?
In case of use with a Digital Audio Workstation (DAW) a virtual MIDI bus (virtual MIDI port) is required. This is a little software which allows you to send and receive MIDI between software applications, internally on your computer. This is necessary to let J74 Progressive SE send MIDI (in output) to a DAW (input) if your willing to use features like Chord Explorer, Circle of Fifths and Live Mode and optionally if you like to sequence chords from Progressive's Chord Explorer from a DAW. On the Mac you already have a virtual MIDI bus: the standard IAC driver bus is a virtual MIDI bus and can be used for J74 Progressive SE communication to the DAW. On Windows, if you did not have that already installed, you need to get a virtual MIDI bus. Several (freeware) virtual MIDI ports are available on the Internet, such as LoopBE1, MIDI Yoke or MIDI OX. LoopBE1 (and LoopBE30) are the recommended option in case of Windows systems (http://www.nerds.de/en/loopbe1.html).
Note: if you want to use both MIDI output and MIDI input features through virtual MIDI ports be sure to use separate virtual MIDI ports to avoid MIDI loops! On the MAC use different IAC driver bus ports (e.g. port 1 and port 2). On Windows either different virtual MIDI port emulations (different software) or an emulation which supports multiple virtual ports (like LoopBE30)
[4] - Where will I get the MIDI files generated by J74 Progressive SE?
The first thing to set up for using J74 ProgressiveSE is a destination folder for the generated progressions (standard MIDI files). You can do this by using the [Select Folder] button on the J74 ProgressiveSE launch window, selecting any folder of your liking.
Note: if a folder is not selected, the tool will save MIDI files on the folder it is launched from. Further keep in mind that you can change the destination folder at any time. This way it is possible to archive the generated MIDI files in different places (e.g. useful if you work on separate projects).
[5] - How can I import the progressions generated by J74 Progressive SE in my DAW?
After you created a progression (as a standard MIDI file) it will be generally very easy to use it in your DAW. All modern DAW's in fact allow you to import the MIDI Files as clips on their MIDI tracks. As a matter of fact most DAW's will also allow you to drag & drop MIDI files directly on the portion of the MIDI track of your choice.
The picture below shows you the MIDI file being dragged & dropped (in this example the DAW is Image Line FL Studio):
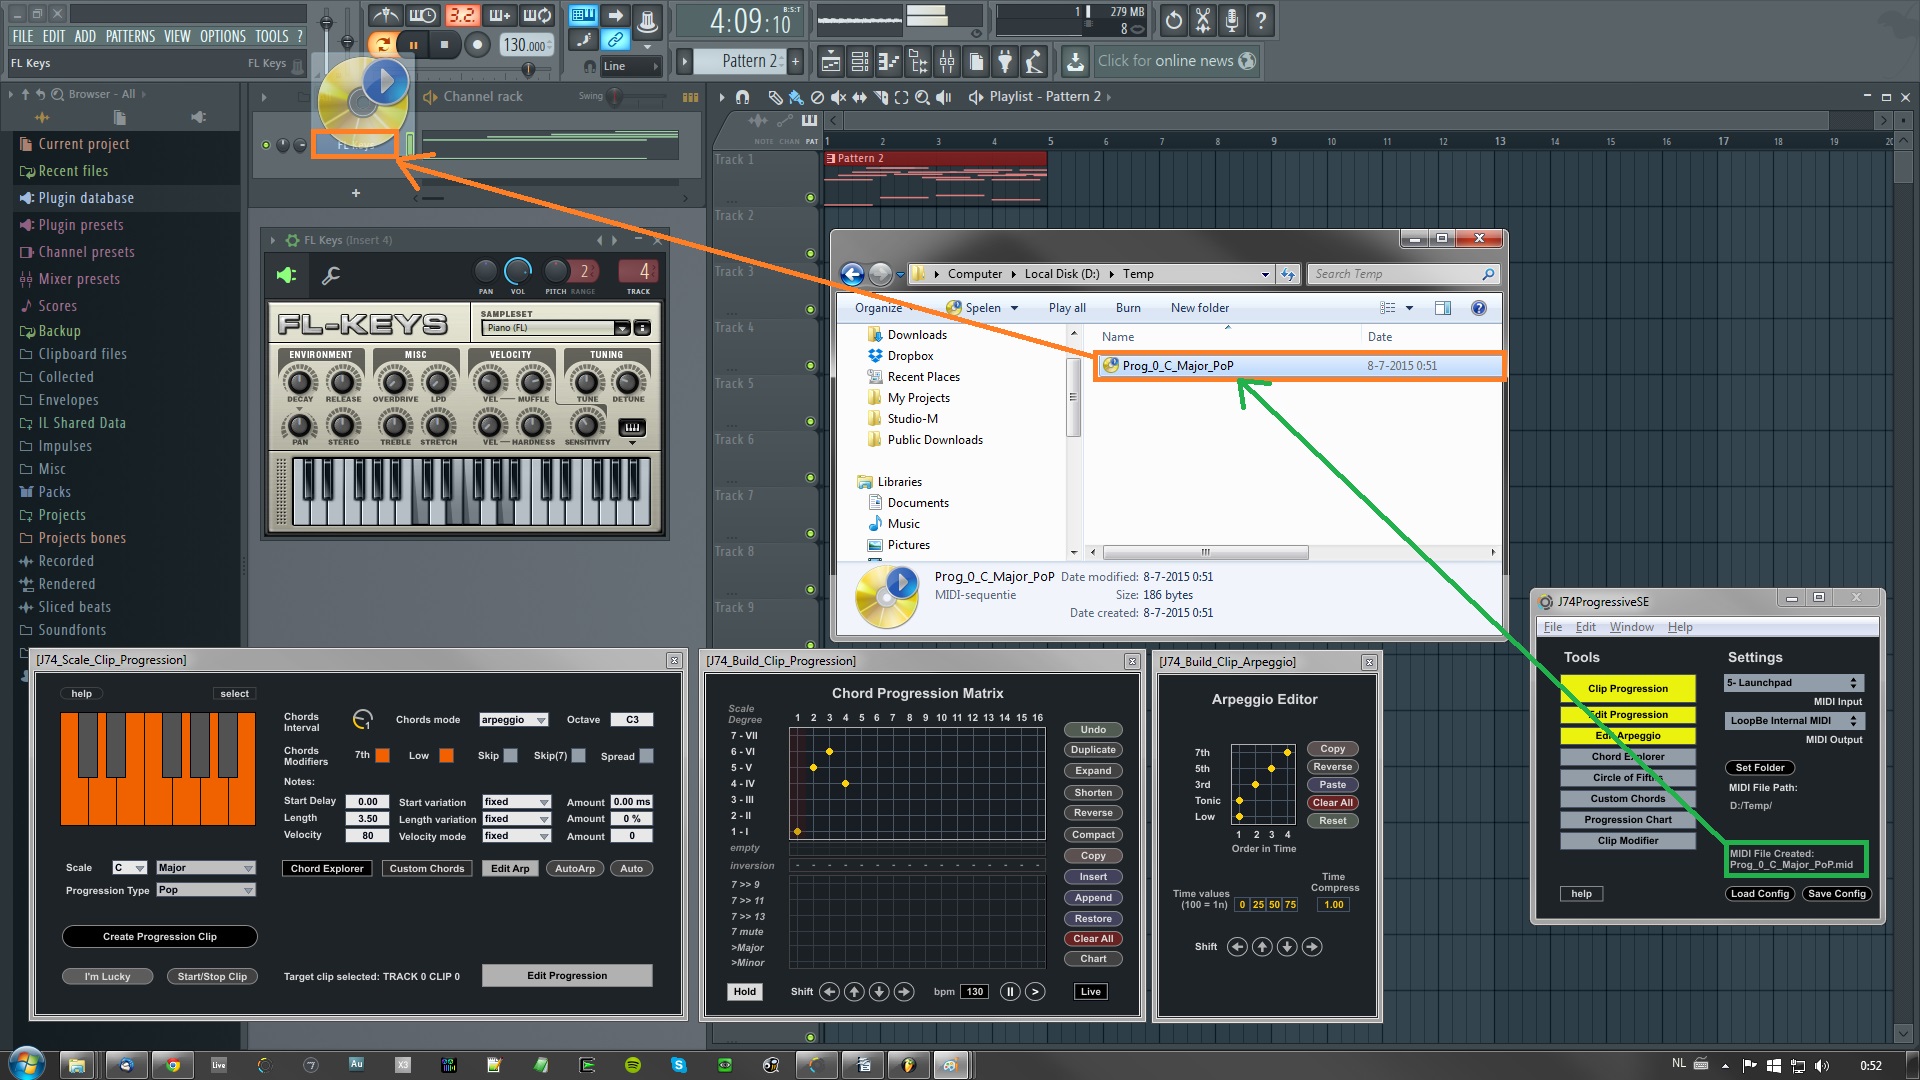
Note: Once imported, the MIDI file becomes a native clip for the DAW and you can use it as any other clip made recording on a keyboard or programming by hand (note: the DAW will import the MIDI notes and will not use the actual MIDI file anymore. So after importing them in the DAW, if you wish to, you can delete the MIDI files in the destination folder used by J74 ProgressiveSE).
Here a few links which provide information on how to import or drag & drop MIDI files in the most popular DAW's:
- Ableton Live
- Apple Gargeband
- Apple Logic
- Cakewalk Sonar
- Cockos Reaper
- Image Line FL Studio
- Presonus Studio One
- Propellerhead Reason
- Steinberg Cubase
[6] - What naming convention is used for MIDI files by Progressive SE?
The MIDI file will be created and named according to the following:
- When you create a new progression from the Chord Progression Editor (using the [Create Progression Clip] button), two identical MIDI files will be created: a MIDI file named Last_Progression.mid and a file named after the selected scale, the progression preset and numbered incrementally (example: being C Major the selected scale, PoP the selected progression preset and being this the third clip generated in order of time, the file name would be: Prog_3_C_Major_PoP.mid). The first allows you to quickly find the last clip you created (when willing to import this into the DAW of your choice); the latter allows you to keep track of your changes.
- When you modify a progression using the [Clip Modifier] tool the MIDI file will be named Modified.mid. If you Undo a change within the [Clip Modifier] tool the state of the progression will be saved in a MIDI file called Undo.mid. This combination allows you to easily find modifications without impacting the progressions generated using the Chord Progression Editor.
[7] - How do I work with MIDI Output for Live Mode, Chord Explorer and Circle of Fifths features?
The [MIDI Output] setting can to be configured if you want to use the Live Mode, Circle of Fifths and Chord Explorer functionality. If working with a DAW you will need to use an internal virtual MIDI Bus for sending MIDI between the applications. Please refer to FAQ-3 for suggestion on which virtual MIDI bus port to use.
Follow this settings:
1) Be sure the virtual MIDI port is properly installed and available to your system (check for instance the MIDI preferences of your OS).
2) Be sure the virtual MIDI port is enabled in the DAW as {input} MIDI port.
3) In J74 ProgressiveSE select this virtual MIDI bus as on the [MIDI Output] menu.
4) It is recommended to enable the selected virtual MIDI port only as input on the DAW to avoid accidental MIDI loops.
5) If you want to use both MIDI output and MIDI input features be sure to use separate virtual MIDI ports to avoid MIDI loops.
Live Mode MIDI output:
On your DAW insert an instrument on a MIDI track as usual and activate MIDI input from the selected virtual MIDI bus/port. In Progressive you can enable Live Mode by activating the [Live] toggle in the Chord Progression Matrix. If you do this ProgressiveSE will send MIDI in output over to the instrument of the DAW using the selected virtual MIDI port and the DAW will receive it. This way you can test your progression while editing or even record it in real time by activating recording on the DAW. Be sure in this case to set the same tempo as the DAW on the [bpm] parameter of the Progression Matrix window. If necessary use the (II) or (>) buttons on the Chord Progression Matrix window to align the measure start.
Chord Explorer and Circle of Fifths MIDI output:
On your DAW insert an instrument on a MIDI track as usual and activate MIDI input from the selected virtual MIDI bus/port. In Progressive you can use the chord buttons on the Chord Explorer and on the Circle of Fifths to send this chords over. ProgressiveSE will send MIDI in output over to the instrument of the DAW using the selected virtual MIDI port and the DAW will receive it. This way you can test chords on the fly, during the creative process.
[8] - How do I work with the Chord Explorer MIDI Input mappings and MIDI input sequencing?
The Chord Explorer is a part of the Progressive SE application which can be controlled by MIDI input. Each chord button is mapped to a specific MIDI note. When a MIDI note is received (on the [MIDI Input] port) it triggers the corresponding chord and the notes of that chord are sent in MIDI output. The duration and velocity of the trigger MIDI note will be used for the chord being triggered. Two possible application of this are possible:
a) You can use a MIDI controller to trigger the chord buttons of the Chord Explorer (jamming hands-on).
b) You can sequence chord triggering of the Chord Explorer from a MIDI sequencer (or DAW) using another virtual MIDI port.
Using a MIDI Controller to control the chord buttons (a)
In this case select the controller you wish to use as on ProgressiveSE Launch window menu [MIDI Input]. Select one of the built-in mapping presets from the [Preset Mapping] menu (for common controllers such as Launchpad or a traditional piano keyboard) or create a new custom mapping file, loading it in using the [Load New Mappings] button. The instructions for creating a custom mapping are explained in Appendix 1 of the PDF user manual.
Sequencing the chord buttons from a MIDI sequencer (b)
In this case you need to use a (second) virtual MIDI port. On the MIDI sequencer (or DAW) be sure this MIDI port is enabled as output port and used by the triggering MIDI track. On ProgressiveSE Launch window select this port as [MIDI Input]. Very important: as in this case a MIDI virtual port is likely to be already in use for the other direction (Progressive output to DAW) be sure to use separate virtual MIDI ports on input and output to avoid MIDI loops (for instance IAC driver port 1 used in Progressive output to the DAW and IAC driver port 2 used in Progressive input from DAW).
Select the PianoC1Cust1 mapping as this offers you a very complete and logical palette for chord mapping, as depicted in the picture below:

Still having issues?
If the answers above still do not solve your problem, please send an email to: info [at] fabriziopoce.com
In the email specify:
- System Type (Mac or Windows)
- System OS version (e.g. Windows 10 v1803 or Mac OSX 10.13)
- DAW type and version (e.g. Ableton Live 9.2)
Please also provide:
- A snapshot (picture) of J74 Progressive SE GUI as you see it.
- A snapshot (picture) of J74 Progressive SE "Max Window" as you see it. You can get this by selecting "Max Window" in the "Window" menu of J74 Progressive SE.
Back to the J74 J74 Progressive SE main page